The world of photography is constantly evolving. People are always finding new ways to manipulate their camera’s settings to create true works of art. Digital cameras have eliminated the expensive upkeep of film stock and dark rooms, which has allowed photographers a cheaper alternative to be creative. One way to creatively use your camera is to try the Streaking Light Effect. This simple yet cool effect can be achieved by following a few easy steps.

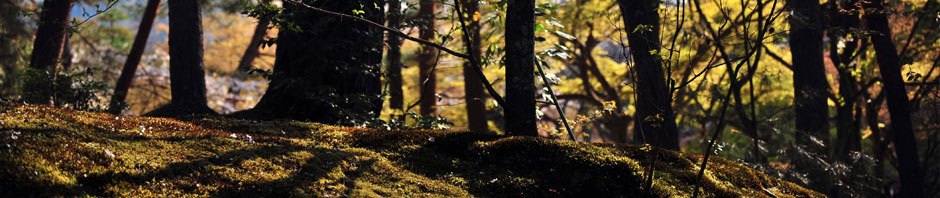
Photo By Matt Platz. Shutter Speed: 20 seconds (Click to Enlarge)
What Causes This Effect?
By now you are probably aware of the three camera functions that affect your photograph: Shutter Speed, Aperture, and ISO. The Streaking Light Effect occurs when a slower shutter speed is used while taking pictures of moving lights. Because the camera’s shutter is open for a longer duration, the camera’s sensor has more time to record the light’s movement as it passes through the frame. This concept is similar to photographing water, which I discussed and demonstrated in my last post.
This effect involves knowing how shutter speed, aperture, and ISO each affect your photograph. If you do not understand how these three camera settings work, I would highly recommend visiting Cambridge in Colour for a more in depth explanation.
How to Achieve This Effect
Unfortunately your camera does not have any automatic settings that will help you achieve the Streaking Light Effect. You will need to operate your camera in Manual Mode. In this mode, you will have to adjust the shutter speed, aperture, and ISO individually. Switch your camera’s dial to M to work in manual mode and follow the three step process I have outlined below.

Camera Modes
Step 1: Adjust the ISO
The first step is to adjust the camera’s ISO. Your camera will provide you with ISO numbers ranging anywhere from 100 to 6400 and up. Using a higher ISO number will result in unwanted “digital noise”, as pictured below. The lower the number, the less digital noise will be present in your photograph. When attempting to achieve the Streaking Light Effect, use the lowest ISO number possible to ensure a noise free image.

Digital Noise
Step 2: Adjust the Aperture
The second step is to adjust the camera’s aperture. What you are photographing will determine the appropriate aperture number to use. Whether you want to blur the background or shoot a landscape like my picture at the top of the page, the aperture number you choose is purely situational.
Step 3: Adjust the Shutter Speed
Lastly, and most importantly, you will need to adjust the camera’s shutter speed. This final step will correctly expose your image. You can use the camera’s Exposure Meter, which is pictured below, to help you choose the correct shutter speed. To correctly expose your image, adjust the shutter speed until the bar on the bottom of the number scale reaches zero. If you do not understand the camera’s exposure meter, take a coupe pictures and continue to adjust the shutter speed until your photo looks acceptable.

Cameras Exposure Meter
Tripods
Because the camera’s shutter will be open longer, it is essential that you use a tripod when trying the Streaking Light Effect. Any movement of the camera during this time will cause your photograph to look “soft”, or out of focus.
You can visit Adorama to help you choose the best tripod for your situation and budget.

Tripod
Seven Steps to Achieve This Effect
Now that you know how the Streaking Light Effect works, I will outline the complete steps you must take in order to achieve it:
1. Set your camera to Manual Mode by switching the dial to M
2. Stabilize your camera on top of a tripod
3. Adjust the ISO to the lowest ISO number
4. Adjust the aperture number to fit your situation
5. Adjust the shutter speed accordingly to correctly expose your shot
6. Focus your scene
7. Snap your picture!
Call to Action!
Now that you understand how to accomplish the Streaking Light Effect, go out and give it a try! Post in the comments what you learned by trying this effect, and leave some advice for anybody trying it for the first time.
Send your pictures to mattplatz@hotmail.com and I will feature them on my blog!
Tune in next week for useful techniques on photographing concerts!

Pingback: Concert Photography Techniques | Photography for Everyday Amateurs